
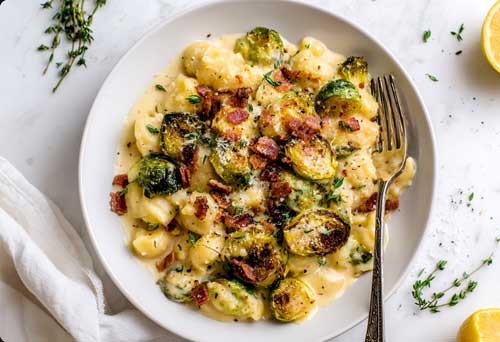
If you love mac and cheese but you’re watching carbs, this one hits the sweet spot. It’s rich and cheesy with a little bite from Brussels sprouts, plus the smoky crunch from bacon that makes you go “okay, one more spoon.” I’ve cooked this on busy weeknights, for holiday tables, and even for a picky 9 year old who swore they hated Brussels sprouts. Plate was clean. No lecture, no drama.
This is the kind of recipe that feels cozy and familiar, but still fresh. Think mac vibes without pasta, a sauce that clings to every fold, and crispy bacon that cuts through the cream. Keep the steps simple, use a single pan and a baking dish, and you’ll have dinner that checks all the keto boxes without tasting “diet.”
Below is the full guide: ingredients, swaps, detailed steps, timing notes, and how to fix common kitchen blips. The instructions are written like I’m standing next to you at the stove. Nothing fancy, just honest food that works.
What is Keto Bacon and Brussels Mac
It’s a low carb “mac” made from Brussels sprouts and optional cauliflower or shirataki “macaroni,” baked in a cheddar parmesan cream sauce, topped with bacon and a quick crispy finish. The “mac” part is the texture and the cheesy pull, not actual pasta. You still get that spoonful of comfort we all want from mac and cheese.
Why Brussels sprouts? They hold shape, they roast fast, and those little leaves catch sauce like tiny spoons. They also bring a lightly sweet, nutty taste that pairs with bacon like old friends.
The flavor promise
- Cheesy and creamy with a stretchy top
- Smoky-salty crunch from real bacon
- Tender Brussels with golden edges, never mush
- Low carb and filling, so your energy stays steady
- Reheats nicely without turning grainy or sad
Ingredients (serves 6 as a side or 4 as a main)
For the base
- 1.5 pounds Brussels sprouts, trimmed and halved (or quartered if large)
- 1 small head cauliflower, cut into bite size florets 4 cups total, optional but good for volume
- 2 tablespoons avocado oil or olive oil
- 1 teaspoon fine sea salt, plus more to taste
- 1 teaspoon black pepper
- 1 teaspoon garlic powder
- 1 teaspoon onion powder
- Pinch red pepper flakes, optional
For the bacon and aromatics
- 8 strips thick cut bacon, chopped
- 1 small yellow onion, diced
- 3 cloves garlic, minced
For the keto cheese sauce
- 3 tablespoons butter
- 1.5 cups heavy cream
- 4 ounces cream cheese, softened and cubed
- 2 teaspoons Dijon mustard or grainy mustard
- 1 teaspoon smoked paprika or sweet paprika
- 1.5 cups sharp cheddar, freshly grated
- 1 cup mozzarella, freshly grated
- 1 cup parmesan, finely grated, divided ¾ cup for the sauce, ¼ for topping
- Salt and pepper to taste
Crunchy top
- ½ cup crushed pork rinds or almond flour
- 2 tablespoons melted butter
- ¼ cup parmesan from above
Optional add ins
- 1 bag shirataki macaroni, well rinsed and dried for extra “mac” feel
- 1 tablespoon chopped fresh thyme or chives
- A squeeze of lemon over the finished pan for brightness
Small note: fresh grated cheese melts smoother than pre shredded. The bag stuff can be a bit chalky. If that’s all you have, it still works.
Tools you’ll need
- Large sheet pan for roasting
- Large skillet or Dutch oven
- 9×13 baking dish or similar
- Tongs and a whisk
- Paper towels
- Sharp knife and cutting board
Step by step: how to make the Best Keto Bacon & Brussels Mac

1) Heat the oven and prep the veg
Set oven to 425°F 220°C. Line a sheet pan. Toss Brussels and cauliflower with oil, salt, pepper, garlic powder, onion powder and red pepper flakes if using. Spread in a single layer. You want space around the veg so they roast, not steam.
Roast 18 to 22 minutes, stirring once halfway. You’re looking for light golden edges and tender centers. If you like deeper color, give it 3 to 5 extra minutes, but don’t let them cross into mush land.
If using shirataki macaroni, rinse it like it owes you money, then dry very well in a dry skillet over medium heat for 3 to 5 minutes to get rid of extra liquid. Set aside.
2) Cook the bacon
While the veg roast, set a large skillet over medium heat. Add chopped bacon. Cook until crisp and browned, about 7 to 9 minutes, stirring now and then. Scoop bacon to a paper towel lined plate. Leave 1 to 2 tablespoons bacon fat in the pan. If it’s more than that, spoon some out. Too much fat and your sauce might split later.
3) Soften onion and garlic
To the bacon fat, add diced onion. Cook 3 to 4 minutes until soft and glossy. Add garlic. Stir 30 seconds till you smell it. No need to brown.
4) Build the cheese sauce
Drop in butter. Once melted, pour heavy cream, then add cream cheese cubes. Whisk over medium low until cream cheese melts into the cream and smooths out. This takes patience. Don’t rush the heat. Add mustard and paprika. Keep whisking.
When the sauce looks smooth and slightly thick, take the pan off the heat and add cheddar, mozzarella, and ¾ cup parmesan in small handfuls, whisking between each. Keep it off the heat while you add the cheese, it melts kinder that way.
Taste. Add salt and pepper. Sauce should be thick enough to coat the back of a spoon but still pourable. If too thick, add a splash more cream. If too thin, return to low heat for 1 to 2 minutes, whisking, till it coats.
5) Bring it together
Fold the roasted Brussels, cauliflower, and any dried shirataki into the sauce. Add most of the bacon, save a little for the top. Stir gently so you don’t shred the veg.
Spoon everything into your baking dish.
6) Make the crunchy top
Mix crushed pork rinds or almond flour with melted butter and the remaining ¼ cup parmesan. Sprinkle over the top. Scatter the reserved bacon.
7) Bake
Slide into the oven at 400°F 205°C for 12 to 15 minutes until bubbling at the edges. If you want deeper color, switch to broil for 1 minute. Watch it like TV. Cheese goes from perfect to burnt quick.
8) Rest and serve
Let the pan sit 5 to 7 minutes. The sauce sets slightly and clings better. Sprinkle herbs if you like. Spoon and enjoy that cheesy pull.
Texture tips that make a real difference
- Dry is your friend. Dry roasted veg grab sauce better than watery veg. Spread them out on the pan. If your oven runs cool, add a few more minutes.
- Heat control. Cheese sauce hates high heat. Melt cheese off the heat and you’ll dodge grainy or split sauce.
- Salt in layers. Bacon and parmesan are salty. Taste the sauce before adding more.
- Fresh grate. I know, it’s an extra tiny task, but it matters for melt and flavor.
- Let it rest. A few minutes on the counter tightens the sauce so scoops hold together.
Make ahead plan
- Day before: Roast the veg, cook the bacon, and build the sauce. Combine everything in the baking dish. Cool, cover and refrigerate.
- Next day bake: Remove from fridge while the oven heats. Add the topping and bake 20 to 25 minutes at 375°F 190°C until hot and bubbling. Broil one minute for color if needed.
- Freezer: You can freeze after mixing but before baking. Wrap well. Freeze up to 2 months. Thaw in the fridge overnight, top, then bake.
Storage and reheating
- Fridge: 3 to 4 days, covered.
- Reheat single servings: Microwave 60 to 90 seconds, stirring halfway. Or warm on the stove with a spoon of cream to loosen.
- Reheat full pan: 325°F 165°C for 15 to 20 minutes, covered with foil, then uncover for 5 minutes to crisp the top again.
Nutrition estimate per serving
This is an estimate, based on 6 servings and standard products:
- Calories: ~520
- Fat: ~41g
- Protein: ~23g
- Total Carbs: ~11g
- Fiber: ~4g
- Net Carbs: ~7g
Add ons like shirataki barely move the carb count. If you skip cauliflower and go all Brussels, net carbs nudge slightly up but still in keto range for many folks.
Why this works for keto
You’re swapping pasta for low carb veg that still feels hearty. Brussels sprouts sit around 5 grams net carbs per cup cooked. Cauliflower comes in even lower. The sauce is heavy cream, cheese, and butter, so you get fat for satiety. Bacon brings protein and that classic smoky note. It’s balanced, you eat less, but feel like you ate more. Magic without the carb crash.
Variations to keep it fresh
- Buffalo style: Stir 2 tablespoons hot sauce into the cheese sauce and top with crumbled blue cheese before baking.
- Ranch bacon version: Add 1 tablespoon ranch seasoning to the sauce. Finish with chopped chives.
- Jalapeño popper twist: Fold in 2 to 3 roasted jalapeños, chopped, and swap half the mozzarella for pepper jack.
- Mushroom and bacon: Sauté 8 ounces sliced mushrooms after the bacon. Cook off their moisture, then proceed.
- Chicken dinner: Fold in 2 cups cooked shredded chicken and a squeeze of lemon. Now it eats like a full main for 4.
- Broccoli swap: Not a Brussels fan at all? Use roasted broccoli florets. Same timings, good bite.
- Nut free topping: Skip almond flour, use pork rinds only or a sprinkle of parmesan for a thinner crust.
Common mistakes and easy fixes
- Sauce looks broken or greasy: Heat was too high or cheese got shocked. Pull off the heat, whisk in a splash of cream, then a small knob of cream cheese. It often rescues the emulsion.
- Veg turned soggy: Crowded pan or low oven heat. Next time, split across two pans. Right now, bake uncovered a few extra minutes to drive off moisture.
- Too salty: Add a splash of cream and a handful of mozzarella to mellow it. A squeeze of lemon at the table wakes things up without more salt.
- Not cheesy enough: Stir in more cheddar while hot, or top with extra parmesan and broil 30 seconds.
- No crunch on top: Your topping layer was too thick or butter was cold. Mix topping again with melted butter and broil briefly.
Step timing guide so you can plan
- Prep veg and bacon: 10 minutes
- Roast veg: 18 to 22 minutes
- Bacon and aromatics: 10 minutes (overlaps with roasting)
- Sauce: 8 to 10 minutes
- Combine and top: 5 minutes
- Bake: 12 to 15 minutes
- Rest: 5 to 7 minutes
Total hands on time feels like 25 to 30 minutes if you move with purpose.
Ingredient swaps and budget notes
- Bacon: Any bacon works. Thick cut gives the best chew. Turkey bacon is fine, just add 1 tablespoon butter to replace the missing fat and a tiny pinch smoked paprika.
- Cream: Half and half will thin the sauce. If that’s all you got, let it reduce a bit longer before adding cheese.
- Cheese mix: Sharp cheddar is the hero. Mozzarella gives pull. Parmesan gives punch. If you only have cheddar, it still works, just keep a little extra for topping.
- Oil: Avocado oil handles high heat well. Olive oil is fine but don’t go too hot.
- Gluten free status: This recipe is gluten free by design. No flour needed to thicken.
Serving ideas
- Serve with a simple green salad with lemon olive oil dressing to cut the richness.
- Add grilled sausage or rotisserie chicken on the side for bigger appetites.
- For a holiday table, it sits well next to turkey, ham, or prime rib. People go back for seconds, you’ll see.
Kid and crowd notes
Kids often say they don’t like Brussels sprouts because they’ve only had them boiled to death. Roasting changes everything. The edges crisp, the centers turn sweet, and the cheese covers any bitter notes. If you’re feeding kids, chop the Brussels a little smaller and go light on red pepper flakes. For crowds, double the recipe and use two pans so the veg still roast right.
My first batch and what I learned
The first time I made this for friends, I rushed the sauce. Cranked the heat, dumped all the cheese at once. It looked glossy, then boom, greasy pool around the edges. Not cute. I pulled it off the heat, whisked in a splash of cream and another little cube of cream cheese, and it came back together. Ever since, I melt cheese off the heat. Feels slower, but it’s actually faster because you don’t have to fix anything.
I also tried it with only Brussels, then with Brussels plus cauliflower. The combo wins for me. Cauliflower adds body without its own strong taste, so the sauce shines more. But if you’re a Brussels super fan, all Brussels is great too.
Clean keto vs dirty keto notes
This recipe leans clean. Real whole veg, dairy, and bacon. If you want to push it even cleaner, skip the pork rind topping and use extra parmesan with chopped nuts like pecans for crunch. If you track every macro, weigh your cheese and bacon, since those swing the numbers most.
Dairy free option that still tastes good
- Use coconut cream in place of heavy cream.
- Swap cream cheese with a dairy free cream cheese style spread.
- Use a meltable non dairy cheese for the cheddar and mozzarella parts. Add 1 teaspoon nutritional yeast for a deeper cheese vibe.
- Keep parmesan off, or use a dairy free hard cheese.
- The sauce won’t be the same, but it’s still rich and satisfying, especially with the bacon and roasted veg.
Quick recap you can screenshot
- Roast Brussels and cauliflower at high heat.
- Cook bacon till crisp.
- Make a smooth cheese sauce with cream, cream cheese, cheddar, mozzarella and parmesan off the heat.
- Fold together, top with pork rinds and parmesan.
- Bake till bubbling, rest, then serve.
That’s the whole play.
Conclusion
If you’re missing mac and cheese, this hits that memory right on the nose, minus the carb hangover. It’s weeknight friendly, holiday worthy, and fridge friendly. Make it once, then next time adjust it to your taste. More bacon. More heat. Extra parmesan. It’s your kitchen, your bowl, your rules.
PrintKeto Bacon & Brussels Mac
Creamy keto “mac” made with roasted Brussels sprouts, bacon, and a rich cheddar parmesan sauce. Smoky, cheesy, and low carb. Easy weeknight bake, great for meal prep too.
- Prep Time: 10 minutes
- Cook Time: 40–45 minutes
- Total Time: 50–55 minutes
- Yield: 6 side servings (or 4 as a main)
- Category: Casserole, Dinner, Low Carb
- Method: Roast + Bake
- Cuisine: American, Keto, Low-Carb
- Diet: Gluten Free
Ingredients
-
1.5 lb Brussels sprouts, trimmed and halved
-
4 cups cauliflower florets (optional, for more volume)
-
2 tbsp avocado oil or olive oil
-
1 tsp fine salt
-
1 tsp black pepper
-
1 tsp garlic powder
-
1 tsp onion powder
-
Pinch red pepper flakes (optional)
-
8 slices thick-cut bacon, chopped
-
1 small yellow onion, diced
-
3 cloves garlic, minced
-
3 tbsp butter
-
1.5 cups heavy cream
-
4 oz cream cheese, cubed
-
2 tsp Dijon mustard
-
1 tsp smoked paprika
-
1.5 cups sharp cheddar, freshly grated
-
1 cup mozzarella, freshly grated
-
1 cup parmesan, finely grated, divided (¾ cup for sauce, ¼ cup for topping)
-
½ cup crushed pork rinds or almond flour
-
2 tbsp melted butter
-
1 tbsp chopped chives or thyme (optional, to finish)
-
1 bag shirataki “macaroni”, rinsed and dry (optional)
Instructions
-
Heat oven to 425°F (220°C).
-
Toss Brussels and cauliflower with oil, salt, pepper, garlic powder, onion powder, and flakes. Spread on a sheet pan. Roast 18–22 minutes, stir once, till lightly golden and just tender.
-
Cook bacon in a large skillet over medium heat 7–9 minutes, till crisp. Remove bacon to a paper towel plate. Leave 1–2 tbsp bacon fat in the pan.
-
Add onion to the skillet. Cook 3–4 minutes till soft. Stir in garlic 30 seconds.
-
Add butter. When melted, pour in heavy cream and add cream cheese. Whisk on medium-low till smooth. Stir in Dijon and paprika.
-
Take skillet off the heat. Whisk in cheddar, mozzarella, and ¾ cup parmesan a handful at a time till melted and smooth. Taste, add salt and pepper if needed.
-
Fold roasted veg (and dried shirataki if using) into the sauce with most of the bacon. Transfer to a 9×13 baking dish.
-
Mix pork rinds or almond flour with melted butter and the remaining ¼ cup parmesan. Sprinkle over the top. Add the reserved bacon.
-
Bake at 400°F (205°C) for 12–15 minutes, till bubbling. Broil 1 minute for extra color if you like.
-
Rest 5–7 minutes. Finish with herbs. Serve warm.
Notes
-
Dry veg roast better. Don’t crowd the pan.
-
Melt cheese off the heat to avoid a grainy sauce.
-
Too salty? Add a splash of cream or a little more mozzarella.
-
No pork rinds? Use only parmesan for a thinner crust, or almond flour.
-
Make ahead: assemble (without topping) up to 1 day, chill. Add topping and bake 20–25 minutes at 375°F.
-
Dairy-free swap: coconut cream + dairy-free cream cheese and meltable alt cheese.
-
Kid tip: chop Brussels smaller and skip the red pepper flakes.