
If you’ve been trying to eat low carb but still crave that crispy, golden, potato-style hash, jicama is about to become your new pantry sidekick. And no, this isn’t another one of those recipes that promises flavor but tastes like cardboard with a fancy name. This is straight-up comfort food that fits your macros.
The Keto Shredded Jicama Hash Bake has all the warmth of a diner breakfast plate without the blood sugar spike or carb crash afterward. It’s cheesy. It’s a little crispy on the edges. It’s got flavor that’ll make you forget it’s low carb. And it reheats like a dream, which means leftovers are not a sad affair.
Before we get into the how-to, let’s talk a bit about the star of this dish, jicama.
What Is Jicama, and Why Should You Care?
Jicama (say it like HEE-kah-ma) looks like a potato’s shy cousin. Rough on the outside, pale and crunchy on the inside. Think of it like a cross between a pear and a potato. You can eat it raw, it’s got this sweet crunch, but once it’s cooked, it turns into something totally different. Less sweet. More mellow. Still holds a bit of bite but plays nice in savory dishes.
Jicama is low in carbs, especially compared to potatoes. One cup of shredded jicama has around 5 grams of net carbs. Compare that to a cup of shredded white potato, which runs you close to 20 grams of net carbs, and you start to see why keto folks are swapping it in.
But the best part? It doesn’t go mushy. Which makes it perfect for this bake.
Why You’ll Actually Want to Make This keto Shredded Jicama Hash Bake
Let’s be honest: most keto bakes fall into two camps. They’re either too eggy and feel like a weird omelet, or they try so hard to mimic “normal food” that they end up tasting like protein powder and regret.
This Shredded Jicama Hash Bake skips all that drama. It gives you the real-deal texture you want from a hash casserole — crispy edges, melty cheese, and enough structure to cut into neat little squares. It works for breakfast, lunch, dinner, or whatever meal you eat at 2 p.m. after forgetting to eat all morning.
Also, it’s stupidly easy. No spiralizers. No baking for three hours. You don’t even have to boil the jicama if you don’t want to. We’ll talk options in a bit.
What You’ll Need
This recipe is forgiving. Swap the cheese. Use different spices. Add cooked bacon. Make it your own. But here’s the base version that works every single time.
Ingredients:
- 1 medium jicama (about 3 cups shredded)
- 2 tablespoons olive oil or butter
- 1/2 medium onion, diced
- 1/2 green bell pepper, diced
- 2 cloves garlic, minced
- 1 teaspoon salt
- 1/2 teaspoon black pepper
- 1/2 teaspoon smoked paprika (optional but worth it)
- 1/2 teaspoon onion powder
- 4 large eggs
- 1 cup shredded cheddar cheese (or pepper jack for spice)
- 1/4 cup heavy cream or full-fat canned coconut milk
- Optional: Cooked bacon bits, chorizo, or sausage
How to Prep the Jicama (The Easy Way)

Shredding jicama is easier than it sounds. Peel it with a knife (vegetable peelers struggle with its skin), then grate it on a box grater or in a food processor. Done.
Now, jicama is crunchy — that’s part of the fun. But if you want it softer, like real hash brown texture, you can microwave the shredded jicama for 5-6 minutes or boil it for 8-10 minutes. Drain it well. I mean squeeze-it-in-a-towel well. Otherwise, you’ll get a watery bake.
If you like your hash with more bite, you can skip that and throw it in raw. It’ll cook in the oven just fine — the texture will just be a bit firmer.
1) Preheat the oven and prep your dish.
Set your oven to 375°F (190°C) so it’s ready to go once everything is mixed.
Grease an 8×8-inch baking dish (or something similar in size) with butter, olive oil, or non-stick spray. Make sure you coat the bottom and sides — you don’t want a stuck-on mess later.
2) Sauté the veggies.
Place a skillet on medium heat. Add 2 tablespoons of olive oil or butter and let it heat up — you’ll know it’s ready when it starts to shimmer or foam slightly.
Add your diced onion and green bell pepper. Stir occasionally and let them cook for about 5 minutes, or until the onions look clear and soft.
Now toss in the minced garlic and stir. Let it cook for about 30 seconds to 1 minute, just until it smells strong and sweet. Don’t let it brown or burn — burnt garlic gets bitter fast.
3) Add and cook the shredded jicama.
Add your shredded jicama right into the same skillet. Spread it out evenly in the pan so it cooks through properly.
Cook it for 5 to 7 minutes, stirring now and then. This step helps remove extra moisture so the bake doesn’t turn soggy later. The goal here is to let it soften a little and take in some of that oniony-garlic flavor.
Once the jicama starts to look slightly golden in places and not watery, it’s ready for seasoning.
Sprinkle in your seasonings:
- 1 tsp salt
- 1/2 tsp black pepper
- 1/2 tsp smoked paprika (optional, but it adds a nice smoky kick)
- 1/2 tsp onion powder
Give it a good stir, and taste a tiny bit to check your seasoning. You can always add more salt or spice if you want.
4) Mix your eggs and cheese base.
In a large mixing bowl, crack in 4 large eggs. Add 1/4 cup of heavy cream (or canned full-fat coconut milk if you’re dairy-free).
Whisk them together until smooth — no streaks of egg white should be visible.
Now add 3/4 cup of your shredded cheese (save the rest for later). Mix well to make a rich, cheesy egg base.
This is what holds the bake together and gives it that comforting texture.
5.) Combine everything into one big mix.
Take your warm jicama and veggie mix and add it to the bowl with the eggs and cheese.
Use a big spoon or spatula and fold everything together — you want the jicama fully coated in the egg mixture.
Optional: This is the point where you can mix in cooked bacon bits, crumbled sausage, or chopped chorizo if you’re using any. About 1/2 cup is a good amount, but feel free to go wild if you’re feeding meat lovers.
6) Fill the baking dish and top with cheese.
Pour the full mixture into your greased baking dish.
Use a spoon to smooth it out so it’s level — this helps it cook evenly.
Sprinkle the remaining 1/4 cup of shredded cheese evenly over the top. You can add a little more if you’re feeling generous — no one has ever complained about too much cheese.
7) Bake it until golden and set.
Put the dish in your preheated oven and bake for 30 to 35 minutes.
You’ll know it’s done when the top looks golden brown and bubbly, and the center doesn’t jiggle if you gently shake the dish. If your oven runs cool, it might take up to 40 minutes — just keep an eye on it after the 30-minute mark.
Optional: If you love a crispy, browned top, turn on the broiler for the last 2–3 minutes. Just don’t walk away — it can go from golden to burned fast under a broiler.
8) Let it cool before slicing.
Once it’s out of the oven, resist the urge to slice right in. Let it cool for at least 10 minutes — this helps the bake firm up, making it easier to cut clean pieces without them falling apart.
If you’re planning to pack it for lunch or meal prep, this step also keeps it from getting watery in your containers.
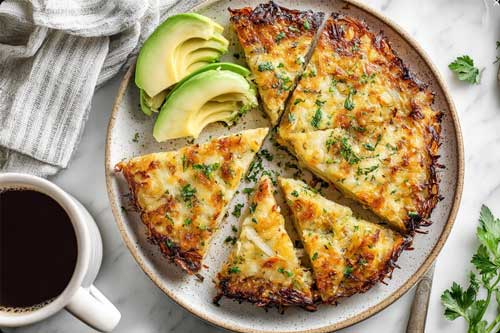
And that’s it — slice, serve, and enjoy warm. Or pop it in the fridge and enjoy cold with hot sauce the next day like a total rebel.
What It Tastes Like
The flavor lands somewhere between a loaded hash brown casserole and a crustless quiche — but less eggy. The jicama gives it structure and a slight crunch that’s super satisfying. The cheese brings the gooey melt. The sautéed veggies bring out a nice bit of sweetness. And if you added bacon? Well, then it tastes like brunch made you its favorite person.
What You Can Add or Change
This recipe is like a blank canvas, but one that already tastes good.
Add-ins that work:
- Cooked chorizo or ground sausage for extra protein
- Diced jalapeños if you like heat
- Mushrooms or zucchini, sautéed beforehand so they don’t make it watery
- Chopped spinach or kale, cooked down first
Cheese swaps:
- Monterey jack
- Mozzarella (for extra meltiness)
- Goat cheese or feta (adds tang)
Spice it up:
- Cayenne
- Chipotle powder
- Chili flakes
- Everything bagel seasoning (yep, it actually works here)
Storing and Reheating
You can make this ahead, which is great if you’re the kind of person who forgets to eat until you’re hangry.
Storage:
- Fridge: Keep in an airtight container for up to 5 days.
- Freezer: Slice it into squares and wrap them individually. Freeze for up to 2 months.
Reheating:
- Microwave: 60–90 seconds per piece.
- Oven: 10–15 minutes at 350°F.
- Air fryer: Yes, it crisps up again. Try 5–6 minutes at 350°F.
Who This Recipe’s For
- People who miss potatoes but not enough to mess up their blood sugar
- Anyone meal-prepping on keto
- Busy folks who want something they can grab from the fridge and heat up fast
- Parents whose kids keep stealing bites of their “special food”
- People who don’t like tofu and don’t want to pretend cauliflower tastes like everything
Honestly, this works whether you’re counting carbs or just want something cozy but not greasy. I’ve made it for keto friends and carb lovers — both groups asked for seconds.
Story Time: Why I Started Cooking With Jicama
I wasn’t looking for jicama. I was looking for something to replace potatoes without feeling like I was sacrificing joy. I tried cauliflower rice, and my brain went “Nope.” Tried rutabaga — decent, but kinda weird to prep. Jicama just… worked.
I still remember the first time I tossed shredded jicama in a skillet with some ghee and salt. It smelled like diner food. That same warm, starchy, breakfast smell — but it was keto-friendly. It didn’t feel like I was hacking my diet. It felt like food.
Now, I always keep one or two jicamas in the fridge. They last forever and somehow always save the day when I’m running low on groceries.
Need a Side Dish or Topping?
This bake holds its own, but if you wanna jazz it up or stretch it into a bigger meal, try:
- Sour cream and hot sauce
- Sliced avocado
- Fried egg on top
- Side of sautéed greens
- Keto-friendly salsa or chimichurri
You could even turn it into breakfast burrito filling — use a low-carb wrap and throw in some extra cheese and protein.
Make It Ahead, Make It Yours
The biggest compliment I’ve gotten on this dish came from a carb-loving uncle who said, “I don’t even care that there’s no potatoes in here. What is this stuff?” That’s jicama, man.
This recipe doesn’t try to be flashy. It’s solid, it works, and you can build your weekly meal plan around it without getting bored. It tastes better the next day, and you don’t need a PhD to make it.
So next time you’re staring at that weird root veggie in the grocery store wondering, “What do I do with this?” — now you know.
Conclusion
You don’t need fancy tools or mystery ingredients to make food that fits your goals and actually tastes good. You just need the right recipe — the kind that lets you throw it together on a Tuesday night or show off at brunch without anyone asking, “Wait… is this keto?”
Keto Shredded Jicama Hash Bake is that kind of recipe.
Now go shred that weird little tuber and make something worth eating.
PrintKeto Shredded Jicama Hash Bake Recipe

This keto jicama hash bake is cheesy, crispy around the edges, and full of flavor. It’s a low-carb meal that works for breakfast, lunch, or dinner. Easy to make and great for meal prep.
- Prep Time: 20 minutes
- Cook Time: 35 minutes
- Total Time: 50 minutes
- Yield: 6 servings
- Category: Breakfast
- Method: Baking
- Cuisine: American, Keto, Low-Carb
- Diet: Gluten Free
Ingredients
-
1 medium jicama (about 3 cups, shredded)
-
2 tablespoons olive oil or butter
-
1/2 medium onion, diced
-
1/2 green bell pepper, diced
-
2 cloves garlic, minced
-
1 teaspoon salt
-
1/2 teaspoon black pepper
-
1/2 teaspoon smoked paprika (optional)
-
1/2 teaspoon onion powder
-
4 large eggs
-
1 cup shredded cheddar cheese (or your favorite cheese)
-
1/4 cup heavy cream or full-fat canned coconut milk
-
Optional: cooked bacon, sausage, or chorizo (about 1/2 cup)
Instructions
-
Preheat oven to 375°F (190°C) and grease an 8×8 baking dish.
-
Peel and shred the jicama. Microwave for 5-6 minutes or boil for 8-10 minutes to soften. Drain well.
-
In a pan, heat oil. Add onion and bell pepper. Cook until soft (about 5 minutes). Add garlic, cook 1 more minute.
-
Add jicama to the pan. Cook 5-7 minutes. Season with salt, pepper, paprika, and onion powder.
-
In a bowl, mix eggs, cream, and 3/4 of the cheese.
-
Add the jicama mixture (and optional meat) into the egg mix. Stir well.
-
Pour into the baking dish. Top with the rest of the cheese.
-
Bake for 30–35 minutes or until golden and set. Let cool for 10 minutes before slicing.
Notes
-
You can skip softening the jicama if you want it firmer.
-
Store leftovers in the fridge for up to 5 days.
-
You can freeze it in slices for easy grab-and-go meals.
-
Add more veggies, spices, or cheese to make it your own.
Frequently Asked Questions (FAQs)
Does jicama need to be cooked before baking in a casserole?
Not always. You can bake it raw if you like a firmer bite, but cooking or microwaving shredded jicama for a few minutes first helps soften it and removes extra moisture. This makes your bake less watery and gives it a more potato-like texture.
Is jicama keto and low in carbs?
Yes. Jicama is very low in net carbs, about 5g per cup and high in fiber, which makes it perfect for keto recipes. It’s a great swap for potatoes in bakes, fries, and hash-style dishes without spiking your blood sugar.
Can I make this jicama hash bake ahead of time?
Yes, and it actually tastes even better the next day. You can prep it the night before, store it covered in the fridge, and bake it fresh in the morning. Or bake it fully, let it cool, then reheat slices throughout the week for quick meals.