
If you’re on the keto train but still crave that crispy crust and soft, airy inside of a freshly baked sourdough bread, you’re in for a treat.
This keto sourdough bread recipe is perfect for those who miss their favorite bread but don’t want to derail their low-carb goals.
Plus, you get the classic sourdough tang, without all the carbs!
Why Keto Sourdough Bread?
Traditional sourdough bread gets its characteristic flavor and texture from the dough’s fermentation by naturally occurring bacteria and wild yeast.
While this process reduces the number of carbs in bread compared to some other types, it’s still not keto-friendly.
Regular sourdough can have as much as 20g of carbs per slice, which isn’t exactly ideal if you’re sticking to under 50g of carbs per day.
That’s where this keto-friendly version steps in.
By swapping out regular wheat flour with low-carb alternatives, you can still enjoy the sour tang and chewy texture, without the carb overload.
And let’s face it, keto baked goods can sometimes be a little dry or flat.
But trust me, this recipe brings the real deal!
What Makes This Bread Low-Carb?
Almond flour and psyllium husk powder are the two main ingredients that make this sourdough keto-friendly.
Almond flour mimics the texture of regular flour without spiking your carb count, while psyllium husk powder gives the bread that chewy texture and airiness you’d expect from a loaf of sourdough.
Together, these two ingredients work their magic to produce a loaf that looks, feels, and tastes like the real thing.
Let’s get into the nitty-gritty of making your own keto sourdough bread at home, shall we?
First, Making a Keto Sourdough Starter (Step-by-Step – Super Detailed for Beginners)
Creating a sourdough starter is like growing your own friendly yeast farm – don’t worry, it’s not as weird as it sounds.
A good starter is what makes your bread rise, gives it that tangy sour flavor, and makes you feel like a baking genius.
Since we’re doing keto, we can’t use regular wheat flour, so this recipe uses low-carb alternatives while still fermenting like traditional sourdough.
The key here is patience, but I’ll guide you through every detail so you can get it right the first time.
What is a Sourdough Starter, Really?
Think of a sourdough starter as a living culture made of wild yeast and bacteria.
It’s like a bubbly, tangy-smelling paste that kickstarts the rise in your bread by producing gases during fermentation.
Traditional sourdough starters are made from flour and water, but for keto, we’ll use almond flour and psyllium husk, plus a little yeast to get things moving faster.
Day-by-Day Plan for Making Your Keto Sourdough Starter
Day 1: The Kickoff
What You’ll Need
- Almond flour – 1 cup
- Psyllium husk powder – 1 tbsp (this helps thicken the mixture and give it a better texture)
- Warm water (around 110°F) – ½ cup (think bathwater warm—too hot, and it’ll kill the yeast)
- Sweetener – 1 tsp (use something like monk fruit, erythritol, or a pinch of honey; don’t worry, the yeast eats it up, so it won’t add carbs to the bread)
- Dry active yeast – 1 tsp
Step-by-Step Instructions
- Activate the yeast:
In a small bowl, dissolve 1 tsp of sweetener in ½ cup of warm water. Sprinkle the dry active yeast over the top of the water. Don’t stir it yet—just let it sit for 5-10 minutes until it gets frothy and bubbly. This is called “proofing” the yeast, and it’s how you know the yeast is alive and ready to ferment. If it doesn’t foam up after 10 minutes, your yeast may be old or your water might have been too hot or too cold—try again with fresh yeast and properly warm water. - Mix the dry ingredients:
In a medium-sized mixing bowl, combine 1 cup of almond flour and 1 tbsp of psyllium husk powder. Stir it well to make sure the psyllium husk is evenly distributed—this is important because psyllium husk absorbs water and helps bind the starter. - Combine everything:
Slowly pour the proofed yeast mixture into the bowl with the almond flour and psyllium husk. Stir well using a spoon or spatula until it forms a thick, sticky paste. It won’t look like traditional dough—it’ll be more like a thick batter, which is what you want. - Cover and let it rest:
Cover the bowl loosely with a clean kitchen towel or a piece of plastic wrap. Don’t seal it airtight—you want some airflow because wild yeast and bacteria need oxygen to do their job. Place the bowl in a warm spot in your kitchen, ideally around 70°F-75°F (room temperature). Leave it alone for 24 hours.
Day 2: Feeding the Starter (First Feed)
By now, you should start to see some tiny bubbles forming in the mixture – this means the fermentation process has started!
If it smells a little tangy, that’s perfect.
If it smells funky or off, you might need to start over, but don’t worry, this happens sometimes.
What You’ll Add
- Almond flour – ¼ cup
- Warm water – 2 tbsp
How to Feed It
- Stir the starter:
Before feeding, give the starter a good stir to redistribute the bubbles and make sure everything’s evenly mixed. - Add fresh almond flour and water:
Add ¼ cup of almond flour and 2 tbsp of warm water. Stir well until the mixture is thick and smooth again. It should still have that sticky paste-like consistency. - Cover and rest:
Cover the bowl loosely again and leave it in the same warm spot for another 24 hours.
Day 3: Second Feed
By the third day, you should see more bubbles and notice a stronger tangy smell.
This is the lactic acid bacteria doing its thing, creating that classic sourdough flavor.
What You’ll Add
- Almond flour – ¼ cup
- Warm water – 2 tbsp
How to Feed It
- Stir and assess:
Stir the starter to check its activity. You should notice it’s a bit puffier and has more bubbles throughout the mixture. - Feed it:
Just like before, add ¼ cup of almond flour and 2 tbsp of warm water. Stir well, cover loosely, and let it sit for another 24 hours.
Day 4: Final Feed and Check
By day 4, your starter should have plenty of bubbles and a pleasantly tangy smell. When you stir it, it should be light and slightly airy.
Final Feeding
- Repeat the same feeding process as Day 3. Add ¼ cup almond flour and 2 tbsp warm water, stir well, and cover it.
- After about 12 hours, check on it. If it’s bubbly, puffed up, and smells tangy, your keto sourdough starter is officially ready to use!
Step-by-Step Recipe for Keto Sourdough Bread
Making Keto Sourdough Bread (After the Starter is Ready)
Here’s what you’ll need:
- Almond flour – 2 cups
- Psyllium husk powder – 2 tbsp (adds structure and mimics the chewiness of gluten)
- Eggs – 4 large (these help bind the dough and give the bread a light texture)
- Apple cider vinegar – 1 tbsp (this helps the bread rise and enhances the tangy flavor)
- Salt – 1 tsp
- Keto sourdough starter – ½ cup (this is your homemade magic ingredient!)
- Warm water – ¼ cup
Step 1: Mix the Dry Ingredients
- In a large mixing bowl, add 2 cups of almond flour, 2 tbsp psyllium husk powder, and 1 tsp salt.
- Stir the ingredients together thoroughly so everything is evenly distributed. You want to avoid clumps of psyllium husk because it tends to soak up water unevenly if not well mixed.
Step 2: Prepare the Wet Ingredients
- In a separate bowl, crack in 4 large eggs. Whisk them until the yolks and whites are fully combined.
- Add 1 tbsp apple cider vinegar and ¼ cup warm water to the eggs. Stir well.
- Now, add ½ cup of your bubbly, tangy keto sourdough starter to the egg mixture and stir until everything is smooth. The starter should loosen up and mix easily with the eggs.
Step 3: Combine Wet and Dry Ingredients
- Slowly pour the wet mixture into the bowl with the dry ingredients.
- Using a spatula or your hands (yes, it gets messy), mix everything together until it forms a sticky dough. At this stage, the dough should be thick but pliable—not runny.
- Let the dough rest for 10 minutes. This gives the psyllium husk time to absorb moisture and helps firm up the dough.
Step 4: First Rise (Fermentation Time)
- Lightly grease a large bowl and place the dough inside. Cover it with a clean kitchen towel.
- Let the dough rise in a warm place for 3-4 hours. Don’t expect it to double in size like regular sourdough—it will puff up slightly, but the rise will be more subtle because we’re working with low-carb ingredients.
Tip: If your kitchen is cold, place the dough near a warm appliance, or turn your oven to the lowest setting for a few minutes, then turn it off and place the dough inside with the door slightly ajar.
Step 5: Shape the Dough
- Once the dough has risen slightly and feels airy, transfer it to a clean surface.
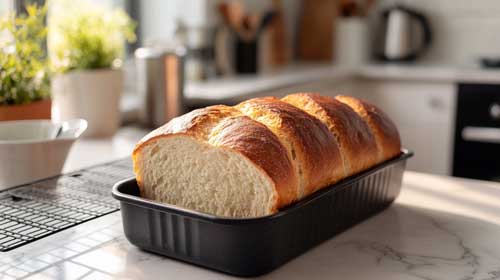
- Shape it into a round loaf by gently tucking the edges under to form a smooth top. If you prefer a sandwich-style loaf, you can place the dough directly into a greased loaf pan instead.
- Cover the shaped dough loosely with a towel and let it rest for another 1-2 hours. This second rise allows the flavor to deepen and gives the dough a bit more structure.
Step 6: Bake the Bread
- Preheat your oven to 375°F (190°C).
- If you want that classic sourdough crust, place a small oven-safe dish filled with water on the bottom rack. The steam from the water will help create a crispy crust while keeping the inside of the bread moist.
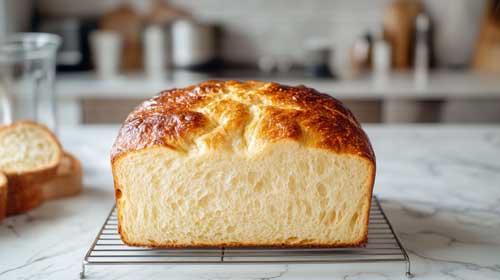
- Place your loaf on the middle rack and bake for 45-50 minutes. The top should turn a beautiful golden brown, and if you tap the bread, it should sound hollow.
Step 7: Cool Before Slicing
This is the hardest part—you need to let the bread cool completely before slicing! Keto bread can feel a bit gummy if you cut into it too soon, so resist the urge and give it at least an hour to cool. Once it’s cooled, grab a sharp bread knife and slice away.
Additional Tips:
- Texture Tip: If the dough feels too sticky to handle, lightly oil your hands or dust them with coconut flour.
- Storage: Store the bread in an airtight container at room temperature for up to 2 days or in the refrigerator for up to a week.
- Freezing: Wrap the bread individually in plastic wrap, place in a freezer bag, and freeze for up to 3 months. Defrost at room temperature and reheat in a toaster oven.
Enjoy your perfectly baked keto sourdough bread with its tangy, nutty flavors!
If you find my recipe too time-consuming or don’t have the patience to wait 4 days for the starter to develop, check out the video I’ve added above! It shows a faster recipe style that skips the long fermentation process yet still yields tasty keto bread in much less time. Perfect for when you want sourdough flavor without the wait!
Nutritional Information for My Keto Sourdough Bread (Per Slice)
This recipe makes about 12 slices of bread. Here’s the approximate nutritional breakdown per slice:
- Calories: 130
- Total Fat: 10g
- Saturated Fat: 1.5g
- Carbohydrates: 4g
- Net Carbs: 2g (after subtracting 2g of fiber)
- Fiber: 2g
- Protein: 5g
- Sugar: 0g
- Sodium: 180mg
Key Notes on Nutrition:
- Net Carbs: The low net carb count makes this bread keto-friendly. It’s calculated by subtracting dietary fiber from total carbs.
- Healthy Fats: Derived from almond flour, coconut flour, and flaxseed meal, which are excellent sources of healthy fats.
- Protein Boost: Adding whey protein powder will slightly increase the protein content.
- Low Sodium Option: Reduce the sea salt slightly if you’re watching sodium intake.
Keep in mind that exact nutrition may vary based on the specific brands of ingredients used, so it’s a good idea to input the recipe into a nutrition calculator for precise measurements.
Tips for Storing Your Keto Sourdough Bread
- Room temperature: This bread stays fresh at room temperature for up to 3 days. Just store it in an airtight container or wrap it tightly in plastic wrap.
- Freezing: Keto sourdough bread freezes really well. Slice it before freezing so you can grab individual slices whenever you want. Just pop a frozen slice in the toaster, and you’re good to go.
- Fridge: Storing in the fridge can dry it out faster, so stick to freezing for long-term storage.
What to Serve with Keto Sourdough Bread
Wondering what to pair with your freshly baked keto sourdough? The options are endless. This bread has a subtle tangy flavor, making it perfect for sweet or savory toppings.
Savory Ideas:
- Avocado and Poached Egg: Perfect for a keto-friendly breakfast. Spread some mashed avocado on a slice of toasted sourdough, top it with a poached egg, and sprinkle with a little salt, pepper, and chili flakes.
- Garlic Butter and Herbs: Toast a slice, rub it with a clove of garlic, then slather with melted butter and sprinkle with parsley. This works great as a side for soups and salads.
- Grilled Cheese: Use your keto sourdough for a gooey, cheesy grilled sandwich. Pair it with a cup of tomato soup for a comforting, low-carb meal.
Sweet Ideas:
- Keto Jam and Cream Cheese: If you’ve got a sweet tooth, slather your bread with a sugar-free jam and some cream cheese for a quick snack.
- Cinnamon Toast: Spread some butter on a slice of toasted bread, sprinkle it with cinnamon and your favorite keto-friendly sweetener, and voila! A sweet treat without the guilt.
A) Common General Issues and How to Fix Them:
1. Bread Too Dense or Flat
- Possible Causes: Not enough hydration, under-proofing, or not enough gluten development.
- Solutions: Make sure to measure ingredients accurately, especially liquids. Let the dough rise in a warm place until it doubles in size. Knead the dough well to develop structure.
2. Crust Too Dark or Burnt
- Possible Causes: Oven temperature too high or baking too long.
- Solutions: Use an oven thermometer to check the actual temperature. Cover the bread with foil to prevent it from browning too quickly. Bake on the middle rack to avoid direct heat.
3. Gummy or Undercooked Inside
- Possible Causes: Over-proofing, too much moisture, or not baking long enough.
- Solutions: Keep an eye on proofing times; the dough should spring back slowly when poked. Ensure the dough isn’t too wet; adjust water if needed. Bake until the internal temperature reaches about 200°F (93°C).
4. Uneven Crumb or Large Holes
- Possible Causes: Poor shaping, uneven kneading, or improper fermentation.
- Solutions: Shape the dough tightly to remove air pockets. Knead until smooth and elastic. Follow fermentation times closely.
5. Lack of Sourdough Flavor
- Possible Causes: Short fermentation time or weak starter.
- Solutions: Let the dough ferment longer for a stronger flavor. Use a healthy, active starter.
B) Psyllium husk can be another tricky ingredient in keto bread recipes; it’s often the culprit behind issues like mushy centers, uneven texture, or even a purple tint. Let’s address these common problems and what might help:
1. Mushy or Undercooked Inside
- Cause: Psyllium husk absorbs a lot of water, and if it’s not mixed properly or there’s too much liquid, the bread won’t cook through.
- Fix:
- Measure psyllium husk carefully—too much can throw off the texture.
- Allow the dough to sit for a few minutes before shaping to let the psyllium absorb the liquid evenly.
- Bake longer at a slightly lower temperature to cook the inside thoroughly without over-browning the crust.
2. Purple Tint
- Cause: Some psyllium husk brands react with baking soda or baking powder, leading to a purple or grayish color.
- Fix:
- Use a high-quality psyllium husk powder, as cheaper brands are more prone to discoloration.
- Reduce the baking soda or powder slightly, or switch to a double-acting baking powder.
3. Dense or Gummy Texture
- Cause: If the psyllium husk isn’t mixed evenly, it can clump and create a dense, gummy texture.
- Fix:
- Thoroughly mix the psyllium husk with the dry ingredients before adding the wet ingredients.
- Use a stand mixer or hand mixer to ensure even distribution.
4. Odd Taste or Overpowering Psyllium Flavor
- Cause: Some psyllium husks have a strong flavor that might overpower the bread.
- Fix:
- Experiment with different brands to find one with a milder flavor.
- Add spices or herbs to the recipe to balance the taste.
Psyllium is a fantastic ingredient for keto baking when used correctly, but it does need a bit of precision. Hopefully, these tips will help smooth out any issues in your recipe! 😊
General Tips
- Ingredient quality matters: Fresh ingredients give your sourdough bread with almond flour a better rise and smoother bite.
- Your kitchen conditions play a part to: Warm rooms speed things up. Cooler rooms slow everything down. Adjust proofing as needed, especially when testing keto dough or sourdough recipes.
- Keep experimenting: Every loaf teaches you something new, whether you’re working on sourdough low-carb recipes, shaping a keto loaf bread, or perfecting your homemade keto bread routine.
General Tips for Psyllium Husk
- Stick to the measurements: Whole husks behave differently from powder, so don’t swap them without adjusting.
- Use fresh psyllium: Old batches can yield strange results and throw off an almond-flour sourdough starter or any of your keto and low-carb recipes.
Hope this helps you get smoother bakes and fewer surprises. Happy baking!
Conclusion
Keto sourdough bread is the perfect solution for low-carb eaters who still crave the satisfying texture and tang of traditional bread. Whether you’re using it for sandwiches, toasts, or a side to your favorite keto-friendly meal, this bread hits the spot without breaking your carb bank.
So, roll up your sleeves, get in the kitchen, and bake yourself a loaf of this keto-friendly sourdough. Your taste buds—and your macros—will thank you!
Frequently Asked Questions (FAQs)
Can I Make This Bread Without Psyllium Husk?
Psyllium husk is key to getting that chewy, bread-like texture. Without it, the bread will likely turn out too crumbly. If you’re in a pinch, flaxseed meal might work as a substitute, but the texture won’t be quite the same.
Why Is My Bread Purple?
Sometimes psyllium husk powder can turn baked goods purple, especially when using certain brands. It doesn’t affect the taste, but if the color bothers you, try experimenting with a different brand of psyllium husk.
Is Keto Sourdough Bread Gluten-Free?
Yes, this recipe is gluten-free. Almond flour and psyllium husk are naturally gluten-free, making this a great option for those with gluten sensitivities or celiac disease.
Can I Add Flavors or Seeds?
Absolutely! Feel free to add herbs like rosemary, thyme, or even a sprinkle of sea salt on top before baking. You can also fold in seeds like flax, chia, or sunflower seeds for extra texture and flavor.
What’s the Texture Like?
The texture is soft and chewy, with a slightly crisp crust. It’s not as fluffy as regular sourdough bread, but it’s as close as you can get with keto ingredients.