
Welcome to my cozy kitchen! Today, we’re making something special: Keto Walnut Snowflake Cookies. These cookies are buttery, nutty, and melt-in-your-mouth delicious—and the best part? They’re completely keto-friendly. Whether you’re a seasoned baker or someone trying their hand at keto baking for the first time, I’m here to guide you through every step. Picture us standing side-by-side at the counter, aprons on, surrounded by bowls of ingredients. Let’s make some magic happen!
Ingredients You’ll Need
Here’s everything you’ll need to bring these cookies to life. Don’t worry; there’s nothing fancy or hard to find here:
- 1 cup of almond flour (fine texture is key for the best cookies)
- 1/3 cup of walnuts, finely chopped (you can buy pre-chopped or do it yourself with a sharp knife)
- 1/4 cup of powdered erythritol (or any keto sweetener you like)
- 1/2 cup of unsalted butter, softened
- 1 teaspoon of vanilla extract
- A pinch of salt
- Powdered erythritol for dusting (this will give the cookies their snowy finish)
That’s it! Simple ingredients that come together beautifully.
Step 1: Prep the Kitchen and Yourself

Before we get to mixing and baking, let’s set the mood. Preheat your oven to 325°F (165°C) and line a baking sheet with parchment paper. This way, we’re ready to go when the dough is done.
Also, grab a medium mixing bowl, a wooden spoon or spatula, and a baking tray. Trust me, having everything at arm’s reach makes baking so much smoother.
Step 2: Butter, Meet Sweetener
Start by creaming your softened butter and powdered erythritol in the mixing bowl. Use a wooden spoon or a hand mixer, whichever feels easier. The goal is to combine them until the mixture is light and fluffy. Think of it as the base of our cookies—it’s what gives them their soft, tender texture.
👉 Pro Tip: If your butter isn’t soft yet, cut it into smaller cubes and let it sit for a few minutes. Don’t microwave it unless you want greasy cookies!
Step 3: Add the Vanilla and Salt
Next, stir in the vanilla extract and that little pinch of salt. Vanilla adds warmth to the cookies, while the salt balances the sweetness. A small detail, but it makes all the difference. Mix everything well to ensure even flavor.
Step 4: Almond Flour Magic
Now it’s time to add the almond flour. Do it in batches, stirring after each addition. This keeps the dough smooth and prevents any lumps. Once all the almond flour is in, your dough should be soft, slightly sticky, but not wet. If it feels too dry, don’t panic—just add a teaspoon of water or almond milk and mix again.
Step 5: Fold in the Walnuts
The walnuts are what take these cookies to the next level. Chop them finely so you get a little crunch in every bite. Gently fold them into the dough. Be careful not to overmix—you want the walnuts evenly distributed but not smashed.
Step 6: Shape Your Cookies
This part is fun! Scoop out about a tablespoon of dough for each cookie and roll it into a ball. Place the balls on your prepared baking sheet, leaving some space in between. They don’t spread much while baking, but a little room is always a good idea.
Once all the dough balls are lined up, give each one a gentle press with your fingers or the back of a spoon to flatten slightly. They should look like little discs.
Step 7: Into the Oven
Slide your tray into the preheated oven and bake for 10-12 minutes, or until the edges start to turn a light golden brown. Keep a close eye on them—almond flour cookies can go from perfect to overdone in no time.
While they’re baking, your kitchen will start to smell incredible. It’s like a warm hug made of butter and vanilla.
Step 8: The Snowflake Moment
When the cookies are done, take them out of the oven and let them cool on the baking sheet for at least 10 minutes. They’ll be very delicate at this stage, so don’t try to move them just yet.
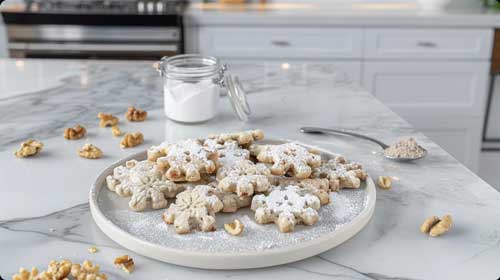
Once they’ve firmed up a bit, transfer them to a wire rack and let them cool completely. Now, for the best part: dusting! Use a small sieve to sprinkle powdered erythritol over the tops of the cookies. The snowy look is what gives these cookies their name—and it’s the perfect finishing touch.
Step 9: Taste and Enjoy
That’s it—you’ve made Keto Walnut Snowflake Cookies! Take a moment to admire your work. They’re beautiful, aren’t they? Now, grab one (or two) and take a bite. The buttery texture, the crunch from the walnuts, the hint of vanilla—it’s all there. Plus, they’re keto, so no need to feel like you’re cheating.
Storage Tips
If you somehow manage to have leftovers (a rare occurrence in my house), store your cookies in an airtight container at room temperature for up to 5 days. For longer storage, pop them in the fridge. They also freeze well—just make sure to let them thaw for a few minutes before eating.
Variations and Substitutions
Want to switch things up? Here are a few ideas:
- No walnuts? Use pecans, hazelnuts, or even unsweetened coconut flakes instead.
- Chocolate lover? Add a handful of sugar-free chocolate chips to the dough.
- Festive vibes? Sprinkle a little cinnamon or nutmeg into the dough for a holiday twist.
The recipe is super flexible, so feel free to get creative!
Why These Cookies Work for Keto
You might wonder how these cookies can taste so good while still being keto-friendly. The secret lies in the almond flour and erythritol. Almond flour is naturally low in carbs and has a mild, nutty flavor that complements the walnuts. Erythritol, on the other hand, gives sweetness without spiking your blood sugar. It’s a win-win.
A Few Troubleshooting Tips
If your cookies didn’t turn out exactly as you hoped, don’t worry. Here are some common issues and how to fix them:
- Too crumbly? This usually means the dough was too dry. Next time, add a little water or almond milk.
- Spread too much? Your butter may have been too soft. Make sure it’s just softened, not melted.
- Too sweet or not sweet enough? Adjust the amount of sweetener to suit your taste. Everyone’s palate is different!
Final Thoughts
Baking Keto Walnut Snowflake Cookies is more than just making a dessert—it’s about creating something with love. It’s the joy of mixing ingredients, the satisfaction of pulling a tray of golden cookies from the oven, and the warmth of sharing them with family and friends.
So, whenever you’re in the mood for a sweet treat that fits your keto lifestyle, come back to this recipe. It’s easy, it’s fun, and it’s absolutely delicious. Now, go grab your apron and get baking—you’ve got this!